Log Cabin Style Interior Walls And Ceilings
- crazydadsmerch
- Nov 17, 2020
- 14 min read
Updated: Mar 1, 2021

When you look around at your existing home and ask yourself, how can I begin to give my home that Log Cabin Style Feel that I am looking for, there is one area where you can add some of that rustic woodsy feeling that forms the background for everything else that you want to do. That is your walls and ceilings.
They are together, the biggest canvas in your home and right now they are probably painted some color or another that really doesn't shout Log Cabin Style!
In a true log cabin, there's not really much to discuss here except for maybe a stain color and type of clear coat. But since you don't already have that natural wood background in a conventional home, this is a great starting point.
As usual this is where your budget comes into play. You can begin at the lower end of the cost spectrum with just some paint color changes and range up through some tongue and groove pine all the way to some half log siding and some stone work. But you have to decide what fits your wallet. As a side note, you also need to decide if this is going to be a long term permanent change to the character of the house or do you want to be able to change decorating schemes at some point in the future?
All of the changes that we just mentioned, except for the paint option are rather involved and make semi-permanent modifications to the home that would require a lot of work to reverse.
The Basics
Beginning at the most basic level, if you are on a somewhat tight budget or you just want to redecorate for a more cabin style feel in your home, but don't want to go all out on this project, treat your walls to a new coat of paint in some nice warm outdoorsy colors. Just paint color alone can go a long way towards changing the feel of a room and give you a background against which to decorate with other features to give that feel that you are looking for.
The subject of paint itself is broad enough that we have dedicated an entirely separate article to that topic. So rather than be repetitive, we are going to send you there for all of the details of that decision.
Adding Natural Wood To Your Room
Part of the magic of a real log cabin is the ambiance that all of the natural wood surrounds you with when you walk in. How can you begin to approach that feeling in a conventional home? Well there are several ways actually. We will begin at the most simple and work our way up the ladder.
All of the options that we will begin discussing now will apply to either a major remodel or new construction so we will lump them all together from here forward.
Trim

Let's assume that you have decided to go one step further than just paint and want to de-formalize the room a bit and add some natural wood to the equation. How about replacing all of your conventional trim; base, casing, crown molding and chair rail with a more rustic option? Again, we have dedicated an entire article to this subject too, so please refer to that.
As a basic starting point that is really attractive and fairly inexpensive, replace your conventional trim with some nice 1x4's that have been stained a natural color such as dark walnut and then finished with several coats of clear. This one simple step will transform your room all by itself!
For more details on this process make sure to read the article on Log Cabin Style Doors, Trim and Handrails.
Tongue And Groove Pine
One of our favorite approaches to adding the ambiance of natural wood to a room is Tongue and Groove Pine. For the rest of the article we will refer to this as T&G.
One of the points of adding T&G for us is to begin to replicate the feel of the logs in a log cabin. Because of that our personal preference is to always install it horizontally rather than vertically or at an angle. If it is laying horizontally it somewhat replicates the look of the inside of a log with a flat surface milled on the side facing the living area. After all it is very uncommon to see a log cabin with vertical or angled logs in the walls.
While you can get somewhat closer to the actual look of a real log by using half-log siding or some other material, T&G is much less expensive, easier to install and is already a common cabin style building material.
So for the purposes of this article we are going to use it as the main focal point of our discussion.
Ceilings
It is very common, even on true log cabins to use T&G on the ceilings instead of sheetrock.
So let's talk about ceilings for a minute. In a true log cabin, either textured and painted sheetrock or T&G makes a very nice ceiling. T&G blends in nicely with the logs to create a complete woodsy type of envelope for the interior of the home. However, sometimes an owner will want to lighten up the interior some, so they may choose to go with a painted sheetrock ceiling.
Over the years, we have found that a properly finished and painted ceiling is one of the best ways to brighten up any room in almost any house where you feel the need for more light. If you look in your favorite paint store, you will find that they sell a specific type of paint called ceiling paint. There are two reasons for this. One, because ceilings experience zero traffic, they do not require as durable of a paint, therefore it can be slightly less expensive. Two, the best color to reflect light into your room is a very pure, flat white. So most ceiling whites are some variation of that color and sheen.
When you are trying to convert the look and feel of a conventional home to a Log Cabin Style Home, either type of ceiling works well. The main difference is that the T&G ceiling trades off some of the light reflecting properties for the ability to transform the feel of the room to more of a natural ambiance by itself or in combination with more of it on the walls.
Here are a couple of tips that we have learned over the years when choosing to use T&G on the ceilings. First it is perfectly acceptable to simply install your T&G in its natural state and then clear coat it all at the same time. Here are a couple of the reasons that we prefer to take a different approach to T&G.

Number one for us, and you will hear us mention this several times through out this website, we don't personally like the yellow or orange color that natural wood, especially pine, takes on over time as it ages and is affected by UV rays and other factors. This is very much a personal preference issue. Many people actually really enjoy this effect and it is part of the Log Cabin Experience for them. If so, then please ignore what we teach about how to lessen that effect.
If you are like us and would prefer to avoid that yellowing of the wood, there are a couple of things that you can do that will help to some extent. The first is to use a water based clear coat rather than an oil based one. The oil based ones start changing the color of the wood the second that they touch it because they have a slight amber color themselves, whereas the water based ones have a purer clear color that tends to white if anything. However, be aware that even this will only put off the yellowing process a little longer than usual. We have found that after a couple of years you still begin to notice that the wood is beginning to change color already.
Our second and most effective strategy is to stain the T&G before we install it. We usually use a very light colored stain called Puritan Pine by Minwax. You can use darker colors but be aware that pine absorbs a lot of stain and therefore changes to a darker color more quickly and more radically than many other woods do, especially hardwoods.
By using a lighter colored stain, we are beginning to protect the wood more and to transform the feel to a warmer and actually more natural feeling color.
The next thing that we do is to trim out the ceiling around the edges with 1x4 trim. Normally we install this on the wall like crown molding, however you might prefer to install it on the ceiling itself for a different look. Either one works just fine. Be aware that the edges of ceilings very often are not perfectly flat and you may want to do some custom fitting of your trim to avoid unsightly gaps. Sometimes you may be able to caulk these gaps with an appropriately colored caulk but be careful here. That usually doesn't work out too well, especially in the long run as the caulk shrinks and cracks.
Also our favorite effect here, when we have used stain on our T&G is to stain our trim pieces a Dark Walnut color and clear them before we install them. This makes for a very attractive contrast to give a nice finished look to your project.
While the clear coat may be applied to the T&G and the trim boards either before you install them or on the entire ceiling after it is put in place, we have found that by far the best way to do your trim boards is to stain and clear coat them before installing.
Our normal process goes something like this. First we go through every piece of wood and sand it on the side and edge that will show. While we are at it we also "ease" the edges of the board just a little. By that we mean to round off the edges just a little bit to remove any sharpness and give them a more finished look. If you shop around, you may be able to find a supplier who stocks a nicer grade of boards that already have this done to them. It might cost slightly more, but it is well worth it because it often allows you to eliminate this step entirely. Also the boards are usually a better quality than standard 1x4's.
Next we wipe on the stain with either a brush or a rag (our preference in this case is a rag because you have more control and waste less stain). Then we wipe it off with a separate cloth like an old t-shirt or terry cloth towel. We go all the way through our pile of trim with each of these operations before beginning the next one.
By the time you have stained your last board, your first ones should be dry enough for clear coat. Double check to be safe and follow the specific instructions on your can of stain.
Our normal procedure for the water based polyurethane semi-gloss clear coat that we like to use is to apply two coats. Spray or brush your trim inside or at least in the shade if possible, then take each piece out into the sunshine to dry while you do the next one if you can. Do two coats this way, all the way through your stack of boards each time. Then right before your final coat, sand each piece lightly with 220-320 grit sand paper to smooth them up, knock off all of the "nubs" and get any random bugs and dust out. Then spray or brush on your final coat of clear and let them dry either in the sun or right where you are working on them. Sunshine works best because it dries the clear quicker with less potential for more bugs and dust.
When they are dry, you can go ahead and install them. We normally install our rustic trim like this without mitering the corners, but using butt joints instead. It's easier and it adds to the rustic look in our opinion. We also don't worry about using colored putty to fill the nail holes for the same reason. You really don't see them unless you look very closely. Plus it goes with the rustic look as far as we are concerned. Feel free to do otherwise if you prefer.
The last thing is that using butt joints will leave you with several unstained cut ends. we just keep a can of stain handy with a rag and quickly apply some stain to the cut end before we nail it to the wall. We don't normally worry about clear coating these spots, but again, follow your preference.
This will give you a very nice looking Log Cabin Style Ceiling that can really add to or change the entire feel of your room. This same installation procedure basically applies to your walls as well. We will discuss any significant variations in this next section.
Walls
When we are installing T&G on the walls, there are several variations that we have seen over the years. We will touch on each one briefly and then discuss why we ended up settling on the style we use most of the time.
Basically your choices boil down to installing T&G either horizontally, vertically or at an angle of some kind. After that, you need to decide to cover the entire wall or only use a wainscot along the bottom several feet.
Here are some of the pros and cons of each style. Obviously this is going to be laced with a heavy dose of personal opinion, so please factor that into your ultimate decision. We just want to share our opinion after having been in many different cabins and seeing how the installation affects the ultimate feel of the home.
The main criteria for us has always been, what looks the most natural and what looks the most like a real log cabin?
That being said, the bottom line to us is that installing T&G horizontally looks the most like a true log cabin wall.
Every other pattern of installing it does succeed in bringing more natural wood into the home, but then it puts it in, what seems to us, a very un-natural pattern, which takes away some of the potential ambiance that could have been achieved.
We have seen many people try to get creative and do something different by installing their T&G at say a 22 1/2 - 45 degree angle on the entire wall. While this has its place in certain applications, the reason that we don't like it personally is that it moves away from the the old-timey, rustic feel of a log cabin and into something more modern and artsy feeling.
The other very common way to install T&G is vertically. Whether you cover the entire wall or just use it for a wainscot, this pattern, to us, says old time farm house more than it says Log Cabin. We have seen many old owner-built cabins that do have it installed this way, so it is very common. However, in our opinion, it really doesn't accomplish what we are shooting for in this process because it doesn't actually mimic the log look.
Now there is nothing wrong with any of these things that we have discussed if that is the look that you desire, but they really don't say "Log Cabin" by their very nature.
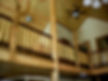
Now let's talk about installing T&G horizontally.
If you look at the picture that we have included here, you will see that while this is obviously not a log wall, laying the T&G horizontally does begin to mimic the look of a home with real stacked log walls. Since that is the the general idea in trying to create a Log Cabin Style Feel to your home, then the closer we can come to duplicating that feel, the closer we get to achieving our objective. If we install a log cabin sort of material such as this in a pattern that doesn't mimic a log cabin, then maybe we missed the boat (or canoe)?
So while we like to install T&G horizontally in our Log Cabin Style homes, you have a couple of choices. You can either cover the entire wall, floor to ceiling, with it or you can cover the bottom 3 feet or so with the T&G pine then from there up, use sheetrock painted in some natural color. This is where the personal preference thing really comes into play. Would covering the entire wall actually look more log cabin-ish? Yeah probably! But our personal opinion is that in a conventionally built home, taking the T&G all the way to the ceiling is somewhat over powering. This is very much simply our preference. So please only consider it as such.

For this reason, the style that we finally settled on when building our cabins, is to use T&G on the ceilings (preferably vaulted ceilings to mimic the feel of a loft) and then use a wainscot about three feet high of T&G with the rest of the wall painted in a light tan or some other natural color. We give all of the T&G a coat of a very light colored stain and then trim out the whole room with dark walnut stained 1x4's.
To us, the over all effect is striking and a great combination of Log Cabin Style tastes in a conventional home. The people who purchased these homes really seemed to love this style and it became one of our main selling points.
As a side note here, if you are using the T&G wainscot/sheetrock approach, here are a couple of installation tips. Keep in mind that if you install your T&G over the sheetrock, you will end up with a very pronounced protrusion from one surface to another. If you have the option, on new construction, install the T&G first up to your finished height. Then stain and clear coat it before you continue on up the wall with your sheetrock. On a remodel, remove the sheetrock up to the level where your T&G will end and put the wood in its place. While there will still be a slight difference in the thickness, your 1x4 wainscot trim will completely hide it.
The second tip is to install your T&G with the tongue up. Shoot a nail in the bottom of the lowest course of boards only, where it will be hidden by your baseboard and then shoot your top row of nails, one into each stud, right where the tongue meets the body of the board. This will mostly hide the top nail when the groove overlaps it. On all succeeding rows, you only need a nail at the top as the tongue of the previous board will hold the bottom in place.
Other Options
Besides using T&G on your walls to add the "real wood" ambiance, there are a couple of other options to consider if your budget, skills and tastes allow.
One of those that is actually seen very commonly in lumberyards and other rustic looking businesses in our area is to use milled half-log siding on your inside walls. It works on both the exterior and interior of your home. It is somewhat more expensive than T&G and requires a different installation approach, especially at the corners.
The best option for corners in our opinion, is rather than trying to fit the pieces to each other at the corners, which will leave unsightly gaps over time as the wood shrinks, is to consider vertical trim at the corners. On the inside corners, run a piece of 2x2 up the corner and butt into it from both sides. On the outside corners, wrap the corner with a vertical 2x4 on one side and a 2x6 on the other side, then butt into them too. Will the wood still shrink and leave a gap? Probably yes. But it will be less unsightly and won't snag your clothes on the outside corners.
If you still have room in your budget, there are some even more high end products that are milled to look more like natural logs with a flat face on them and are designed to be spaced apart enough to use actual chinking between them.
Another step up the ladder is to actually use real logs with a flat side on them to attach to the wall then leave the rounded side facing the interior. This would allow you to have the overlapping Lincoln Log style look on your corners. Keep in mind that this approach actually eats up a significant amount of square feet from the foot print of a room, especially if it's a small one.
A final option to mention for your walls is stone. Never forget the beauty and natural feel of stone in your Log Cabin Style Home. Think stone fireplace. Remember, you don't have to have a stone fireplace to have a stone wall.
On the interior of your home, if you choose to go this route, we highly recommend artificial stone. This is because of the weight issues and ease of installation that we discuss at length in the fireplace article.
Stone works great as an accent wall, for a dividing wall or as the facing underneath of a bar or half wall on the side away from the cabinets.
Log Posts
This is probably a good place to also discuss using logs as trim and accent pieces to really set off your room.
Besides using vertical logs as posts here and there or maybe even a beam over an opening, we have seen them used as edging around fireplace mantles and hearths, along the front of bars, etc.
Also, if you are really creative, consider going out into the woods hunting for some unusual pieces of wood that can be used in unique places such as supports for bars and mantles or as posts in your stairway handrails.
Lastly, one of our favorites, is there a place where you could work in a tree trunk, maybe even with a branch or two as a post to support something. It makes a great conversation piece too!
Now we realize that at this point we are talking about some rather involved ideas that will usually require a significant amount of skill to accomplish. But we mention them because they are some of the really neat decorating ideas that we have seen which really add a finishing touch to a Log Cabin Style Home.
Wrap Up
When it comes to finishing the inside of your Log Cabin Style home. think wood!, How can I add more natural looking wood to my walls. ceilings and trim? Moving in that direction is what brings that Log Cabin Style Feel to any conventionally built home.